本文是《维塔士精英访谈》系列之一,旨在分享维塔士成员的职业成长故事与专业经验。维塔士艺术总监Nguyen Minh Nha与Sparx*(维塔士旗下的工作室)资深美术师Anrich Van Castricum Wolmarans将带领我们领略运用第四代虚幻引擎构建虚拟世界的全过程。
在电子游戏行业里,世界构建是指从游戏美术素材库中提取环境资产,并将其组合到一起从而为游戏创造出有趣的组合和美丽的环境的过程。世界构建已成为游戏开发过程中的关键组成部分,同时,诸多行业领先的游戏作品将其视为优先要务,以便为玩家打造出高度沉浸式的游戏体验。
因受到由Clinton Jones 于2021年在Youtube上发起的3D社区渲染挑战(3D Community Render Challenge)的启发,维塔士的中央技术小组(CTG)组织了一场面向全公司的名为“全新地平线”的虚幻引擎构建挑战。该赛事为维塔士成员们提供了一个尝试等级创建,并在工作项目外展示自己创造力的机会。
纵观整个赛事,参赛选手们纷纷组队,并采用虚幻引擎(4.27 (UE4))构建令人惊叹的游戏环境。最终,我们的参赛团队们纷纷提交了出色的原创成果,其中一组团队以优异的表现顺利出圈。
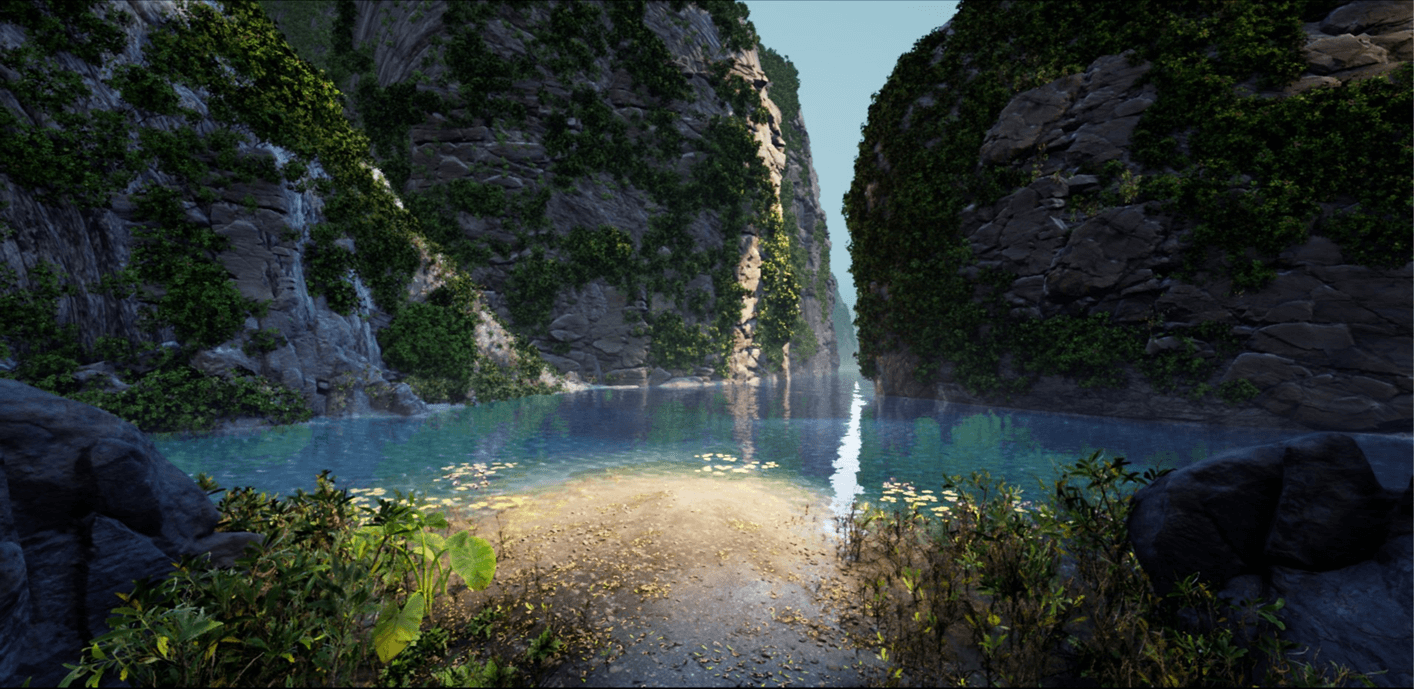
“Trang An Simulated” “虚拟越南长安名胜群”
该款名为“虚拟长安名胜群”的作品是由维塔士艺术总监Nguyen Minh Nhat与维塔士旗下Sparx*工作室的资深美术师Anrich Van Castricum Wolmarans受到越南长安名胜群的至美景色启发而联手打造。

我们专访了Nhat和Anrich,深入了解二人如何运用虚拟引擎UE4从零开始,逐步创造出这款美得令人窒息的场景。
虚拟长安名胜群的诞生过程
Nhat,Anrich,感谢接受今天的访谈!能否谈一下,当初为什么选择越南长安名胜群作为项目主题?
Nhat:当我们为这个项目进行头脑风暴时,我意识到自己希望能够展现越南之美。一个关键点是如何充分利用我们在视效(VFX)方面的专业知识,尤其Anrich和我均供职于Sparx*的特效团队。
我们曾想出很多不同的创意和地点,但最终锁定长安名胜群作为项目主题,这主要归功于当地优美的景色以及它是越南的标志性地点。此外,我们基于现有的资产,采用虚幻引擎的Megascan插件从零开始创作。
Anrich:此外,考虑到时间框架方面的优势,长安名胜群项目中景色的合成更具有现实意义,且更加可行性。
你们当初是怎么想出虚拟长安名胜群这一创意的?
Nhat:Anrich和我当初希望打造出一款非常酷炫的特效作品,然后我们就立刻就联想到超自然与超现实的范畴。我们从电影湮灭(Annihilation)中的泡沫受到启发,并将其融入到长安名胜群的景色当中;我们一直秉承这一点直至项目结束。我们所构建的世界是一个群山环绕、绿水拥抱的悠美入胜的山谷,但同时它又是一个濒临崩溃的虚拟世界。我们的游戏人物需要在与周遭一切共同湮灭之前,奋力逃离厄运。
您能否详述一下动画的创作过程?
Nhat:一开始,我直接采用虚幻引擎来塑造长安名胜群里的山川与地形,采用的素材是我在谷歌上找到的一张图片。然而,在塑造过程中,由于无法获得我期待的具体3D图形而遭遇局限,因此我们没能在这一方法中进行下去。
后来,我们采用了maya来塑造网格,因为我们希望能够从一开始就确保尺寸正确无误。
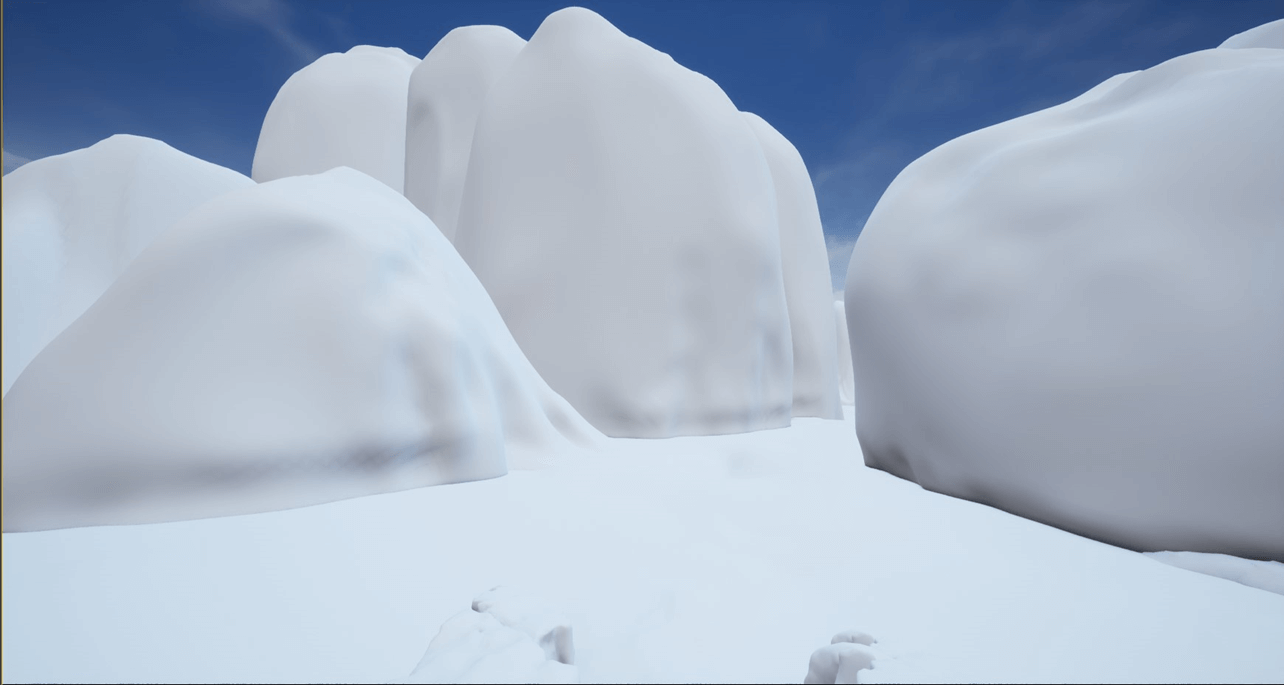
此外,我们还作了进一步搜索,从而确保区域内的山峦高度以及树叶类型都是准确的。在将其倒入UNE4之后,我们为第一个关口处的基础网格指定了材料。
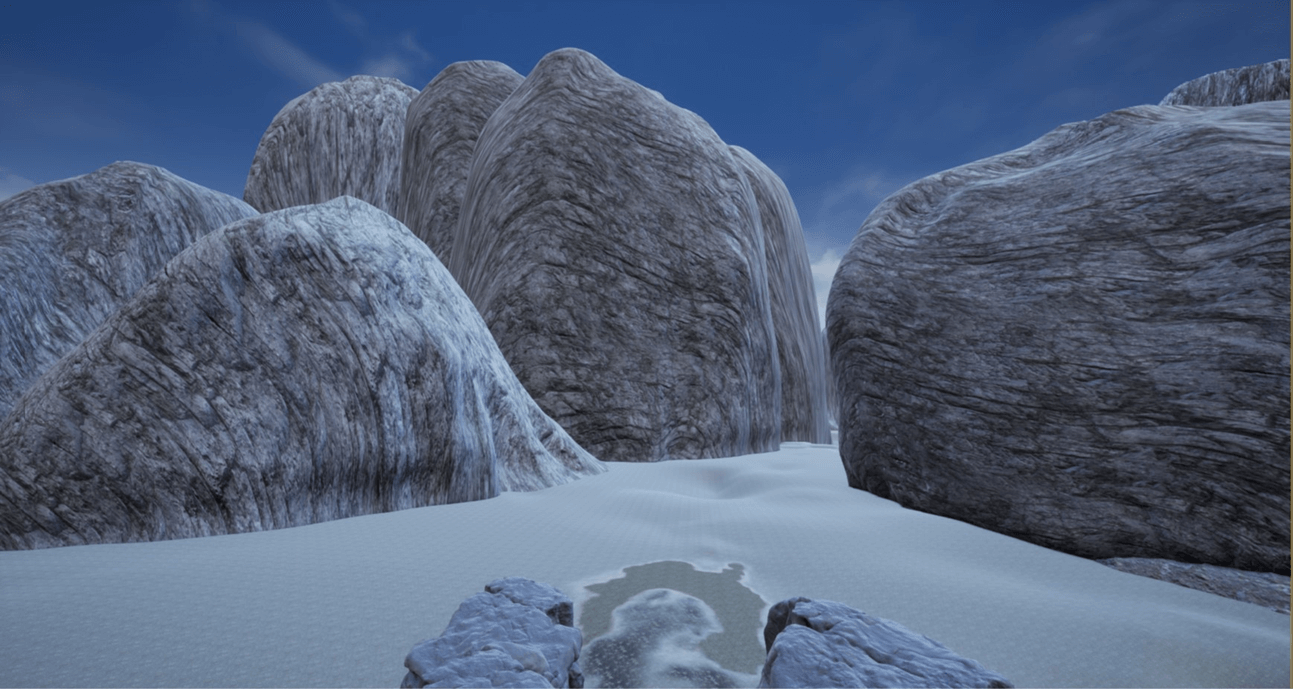
接下来,我们采用Megascan中的现有资产为山峦增添了更多细节。
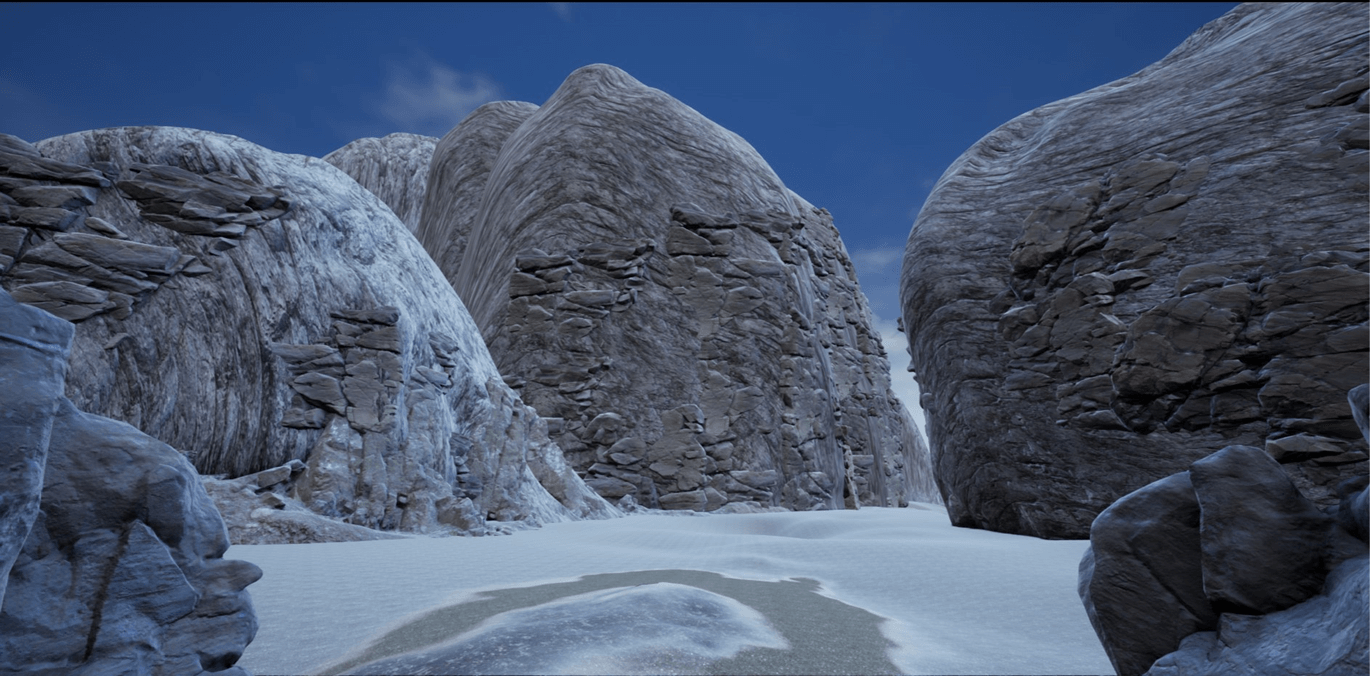
在第三个关口,我们通过UE4中的水渲染以及海洋工具,采用Megascan中的资产对其进一步优化,从而与我们所期待的视觉效果相符。此外,我们还对地面材料增添了图层,凸显水面与陆地交接处的湿度效果。

接下来,我们为其增添了第一轮灯光与植被资产。由于Megascan中没有任何关于具体树叶的现有资产,于是我们就采用了现有的植物资产。我们对其颜色、材质以及尺寸进行优化,从而符合我们所预期的视觉效果。
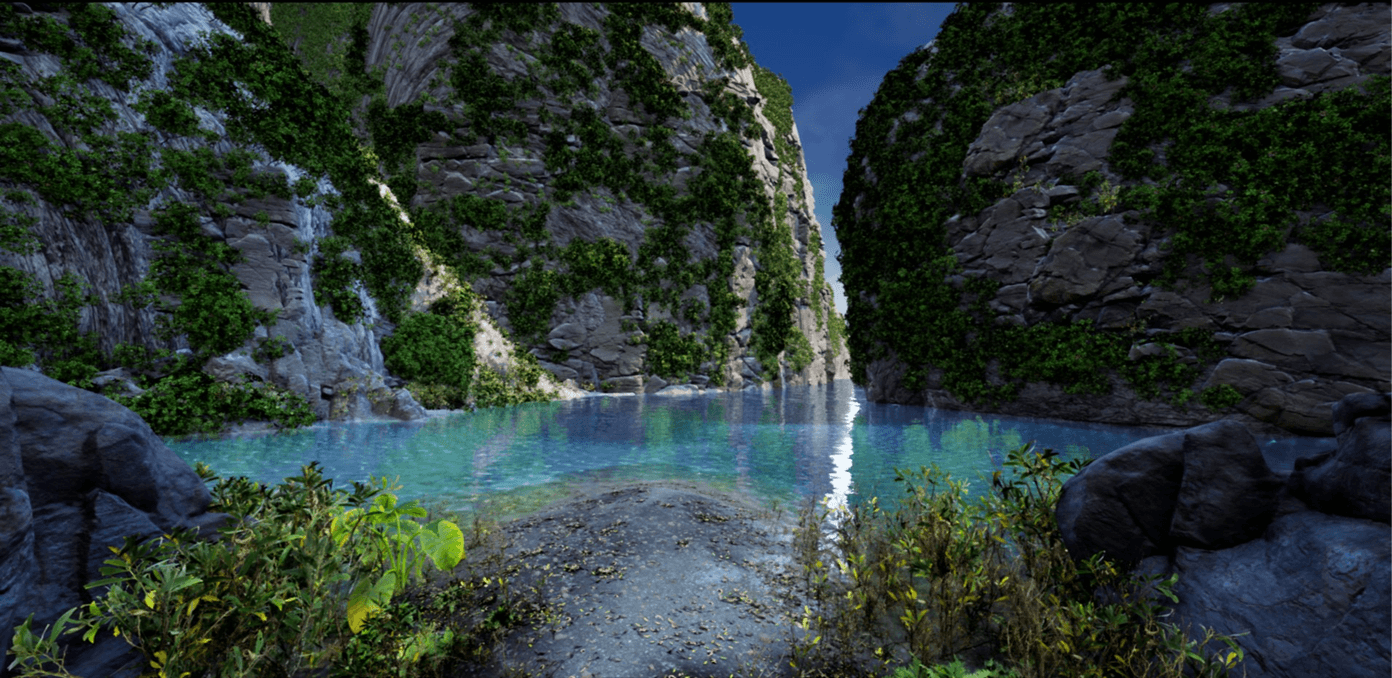
在第五个关口,我们进行了一些后期处理、颜色校正以及氛围雾气。大功即将告成。
在第六个关口,我们为景色增添了一些生灵,包括一些游泳的鸭群、天空中飞翔的鸟类,并增加了雾气氛围。
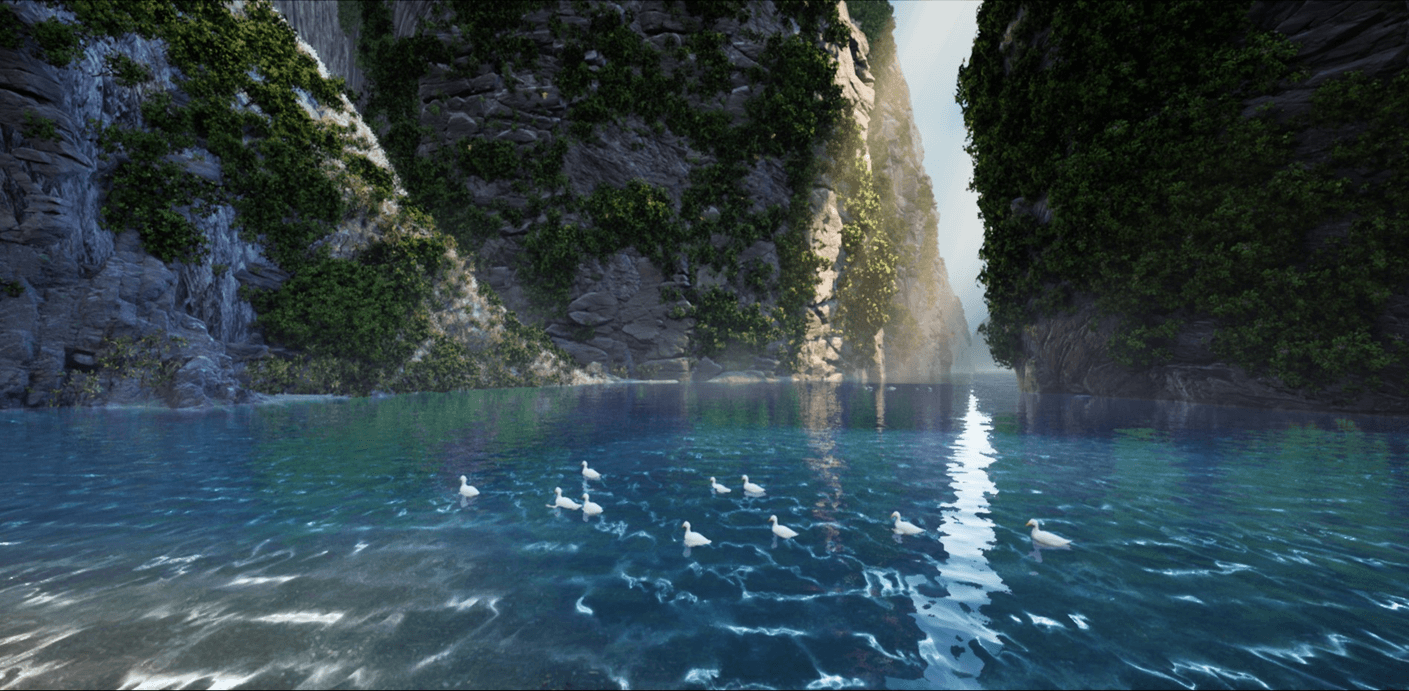
我们在Maya中对鸟儿进行建模并操控,随后将其以Flipbook的格式进行渲染,以便于我们将其载入UE4中的Niagara插件来创造鸟群。乍眼一看,它看起来很简单,因为我们只是从远处观望。
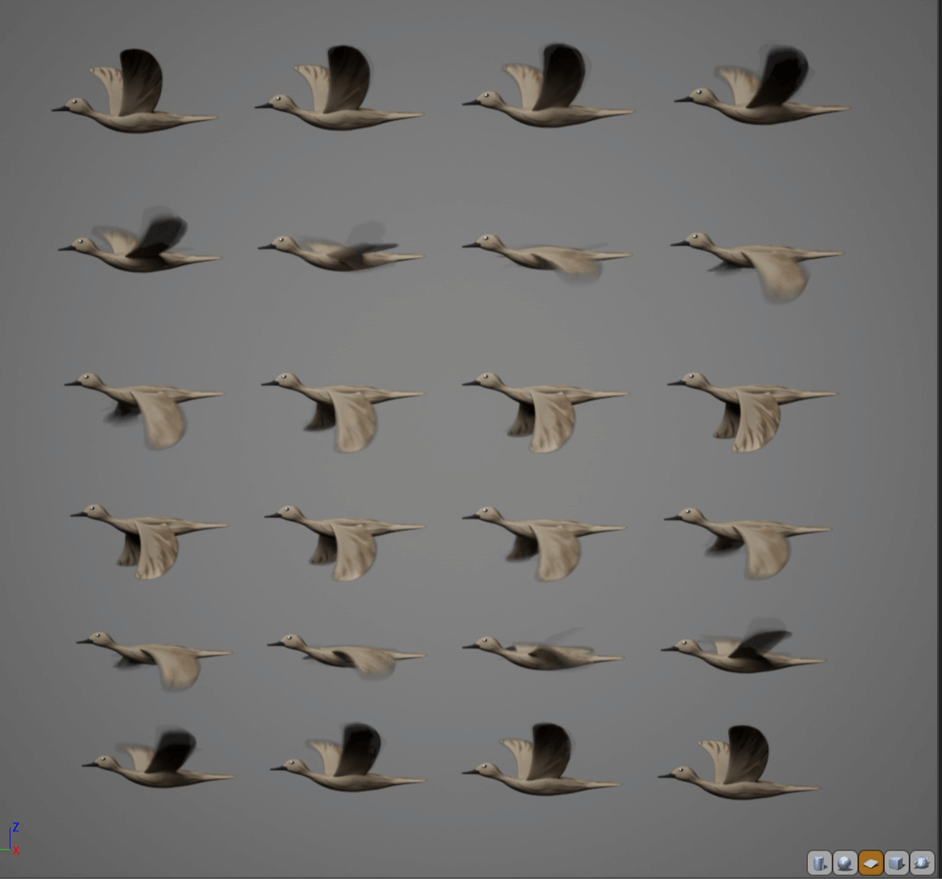
在Maya中创建鸟群
你们是如何在视频中创建障碍/泡沫的?
Nhat:障碍的开发流程非常直接。我们对每个元素采用了多个多颜色质地追拍的图层,从而构建出颜色变化效果,然后采用UE4的Depth Fade节点对接近地表的区域进行处理。视频中所看到的扭曲的障碍实际上最初就是为了展现出玻璃材质的效果。
所有的参数均可通过一个定序器(sequencer)进行控制,因而我们可以很轻易地对其进行艺术操控。除了障碍之外,我们还能对其他内容进行控制,比如灯光、雾气风味以及其他一些特效。
采用VFX定序器对障碍的扭曲效果进行控制
您对这个项目有什么反思吗?
Nhat:我业余时间里习惯涉猎一些等级创建的内容,并且我一直对如何运用UE处理现实灯光的问题很感兴趣,因而能有机会在这次挑战中接触这一话题对我而言非常棒。当初一开始,为了保持超现实的氛围感,我曾尝试设计一个亮度较低的昏暗式的环境效果。后来,我希望能够更多地展示一些环境元素,因此我就调高了亮度,并通过一些灯光效应(比如水面反射)来构建出对比效果。
Anrich:总体而言,这是一次非常棒的学习体验。我认为,这场挑战帮助我提升了项目管理能力和时间管理技巧。其中,我学到的关键一点是:采纳最初的创意,然后不断修剪优化,同时又不能太过于执著。很重要的一点是,要注重实际,尤其当时间框架非常受限的时候尤为如此。
感谢Ahat和Anrich创作出如此令人惊艳的作品。通过尖端的工具、技术以及个性化的培训,我们饱含激情的游戏创造者们一直在不断努力为世界各地的玩家呈现最佳的游戏体验与品质。